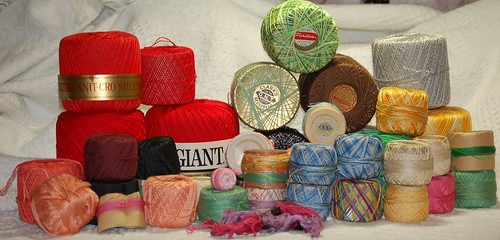
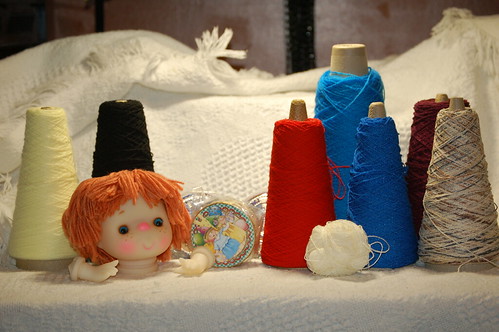
I listed some folders on e-bay. I'm selling them in packs of 10. The folders are great for cards, mini albums, altered projects etc.
http://cgi.ebay.com/ws/eBayISAPI.dll?ViewItem&item=260761429167
Thursday, March 31, 2011
Wednesday, March 30, 2011
Or do without.
I love this poster and the saying.
I think about this often when I am crafting.
Use it up
Wear it out
Make it do
Or Do without!
I have made pants for my son out of an old pair of my jeans. Repairing clothing is a common thing in my house. I don't get hair cuts or wear make up. My son, husband, and brother all get haircuts at home. My Mom gave us her old pair of clippers and I've been cutting the boys hair ever since. Anytime I want to make a project or do something around the house I look at what we have before considering buying anything new.
We all have lots of little ways of saving money. What ways do you use?
Tuesday, March 29, 2011
Thank you card
Hi everyone,
I don't usually make very many cards but I was inspired to make this one. This week G45 is asking blog readers to make thank you cards or friendship cards and post them to the Facebook G45 fan site. This is the project that I made.
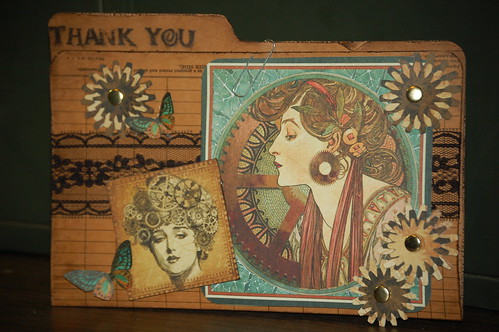
The flowers were cut out of paper from the Steampunk Debutante collection. No surprise there since it's the only collection I own! :) Anyway, my Aunt let me borrow her Cricut so I used that to cut the flowers. I layered different sizes of the flowers and held them together with a brad. They are hot glued to the card. The butterflies and ladies are from the G45 paper also. The lace is from my stash.
The folder that I used for the base of the card came from Goodwill. I recently wrote two posts about these folders. I REALLY love them. I have tons though so I am going to sell 220 printed and 40 plain folders.
I don't usually make very many cards but I was inspired to make this one. This week G45 is asking blog readers to make thank you cards or friendship cards and post them to the Facebook G45 fan site. This is the project that I made.

The flowers were cut out of paper from the Steampunk Debutante collection. No surprise there since it's the only collection I own! :) Anyway, my Aunt let me borrow her Cricut so I used that to cut the flowers. I layered different sizes of the flowers and held them together with a brad. They are hot glued to the card. The butterflies and ladies are from the G45 paper also. The lace is from my stash.
The folder that I used for the base of the card came from Goodwill. I recently wrote two posts about these folders. I REALLY love them. I have tons though so I am going to sell 220 printed and 40 plain folders.
Crafts
Hi everyone!
I have been crafting a lot but I haven't posted pics. This is what I've been up to:
1.) I wrote two and a half mini scrapbook tutorials for scrapbook-crazy.com. The third will be done soon. I believe she will be posting one a month. The first one is up now!
2.) Dad and Karen gave me all their family photos to scrapbook. I have been working on that but it will be a long process. I started with my youngest brother's pics first since he is graduating from High School in May. That way we will be able to display his pics at the open house.
3.) I've been trying different techniques that I have watched on You Tube. One was the plastic grocery sack flower colored with purple alcohol ink.
I have also been sorting and organizing my scrapbook supplies. There is a small box of things that I am going to get rid of sitting in my bedroom.
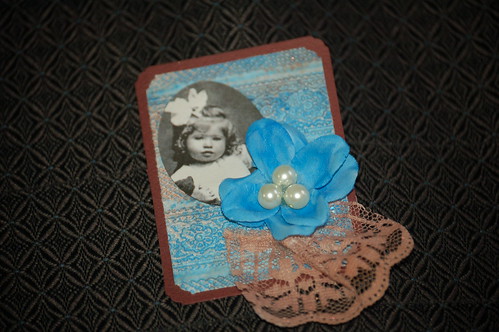
This is the first ATC I ever made.
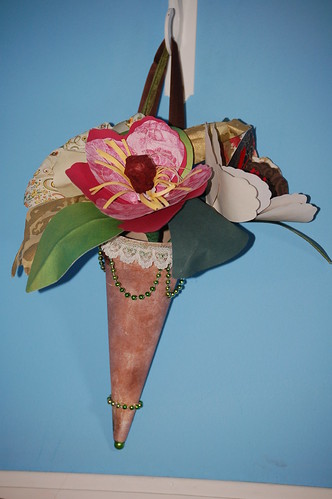
One of my recent posts was all about my friend Janet giving me some great craft supplies and flower. I made this holder for three of the flowers. The holder was a cone for crochet cotton. I used the cotton up and saved the cone. I like it.
I have been crafting a lot but I haven't posted pics. This is what I've been up to:
1.) I wrote two and a half mini scrapbook tutorials for scrapbook-crazy.com. The third will be done soon. I believe she will be posting one a month. The first one is up now!
2.) Dad and Karen gave me all their family photos to scrapbook. I have been working on that but it will be a long process. I started with my youngest brother's pics first since he is graduating from High School in May. That way we will be able to display his pics at the open house.
3.) I've been trying different techniques that I have watched on You Tube. One was the plastic grocery sack flower colored with purple alcohol ink.
I have also been sorting and organizing my scrapbook supplies. There is a small box of things that I am going to get rid of sitting in my bedroom.

This is the first ATC I ever made.

One of my recent posts was all about my friend Janet giving me some great craft supplies and flower. I made this holder for three of the flowers. The holder was a cone for crochet cotton. I used the cotton up and saved the cone. I like it.
stylish blogger
Apparently, I am a stylish blogger! Well, at least, according to KnitYoga!

The rules of the award are:
a) Thank the person that awarded you:
Thank you, KnitYoga!!
(b) List 7 things about myself:
1.I love to learn all kinds of crafts.
2. If I don't make something everyday then I start to feel restless and cranky.
3. I love vintage and steampunk. I love old things and things that are made to look old.
4.I love to go to thrift stores, garage sales, auctions, and antique malls.
5. I love water. Going to Lake Michigan is one of my favorite summer things to do.
6. Tea, coffee, milk, and water are pretty much all I drink. Occasionally I get to have a rum and coke. Mmm yummy!
7. Historic Charlton Park is one of my favorite places to be.
(c) Pass the award to 15 other stylish bloggers:
I had trouble with this one. I'm not ever sure I follow that many blogs. These are my top six:
In no particular order, my choices are:
1. ddivadesigns
2. My Paper Castle
3. ScrappyHappiness
4. ScrappyHappiness
5. WhitneySews
6. WooWork
Bottle Cap Mini Scrapbook
Hi everyone!
My first mini book tutorial has been posted on scrapbook-crazy.com.
Check it out!
http://www.scrapbook-crazy.com/bottle-caps-scrapbooking-mini-book.html
My first mini book tutorial has been posted on scrapbook-crazy.com.
Check it out!
http://www.scrapbook-crazy.com/bottle-caps-scrapbooking-mini-book.html
Sunday, March 27, 2011
Folder mini
My last post was about my file cabinet and folders that I bought at Goodwill. I made a mini out of some of the folders. My hubby found a flower behind one of the drawers. So, I colored it with alcohol ink and some homemade glimmer mist.
I used:
4 printed folder
1 plain folder
Some ribbon for the closure
Lace for the back of the flower
Flower found behind one of the drawers
The book has eight pages and three pockets. I just made it tonight. It is not decorated yet but I'm really happy with it so far.
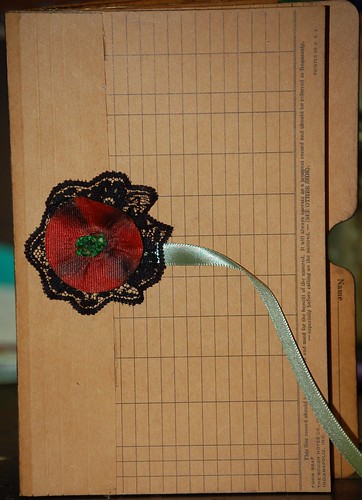
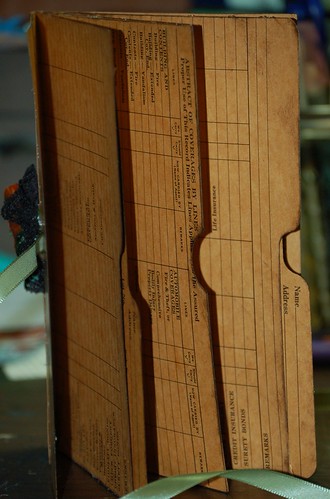
The first two printed folders are glued back to back. I used hot glue on the bottom and two sides in order form my first pocket. The front of the next folder was glued to the front of the previous folder. I punched a half circle on the top of the folder fronts to make it easy to pull things in and out of the pocket. The back of the last folder was glued to the back of the previous folder. Again, only three sides were hot glued to form the last pocket.
I used one place folder to form the binding of the book. I cut off the bottom of the folder and added a few score lines to match the score lines that were already on the folder. The green ribbon was hot glued on first and then I glued the spin on over that.
I think the book will look really nice decorated with vintage inspired papers. The G45 steampunk debutante and some other papers that I have be great. Hopefully I'll be able to finish it up in the next couple of days. I have several other projects in the works and a busy week ahead.
Have a great week everyone!
I used:
4 printed folder
1 plain folder
Some ribbon for the closure
Lace for the back of the flower
Flower found behind one of the drawers
The book has eight pages and three pockets. I just made it tonight. It is not decorated yet but I'm really happy with it so far.


The first two printed folders are glued back to back. I used hot glue on the bottom and two sides in order form my first pocket. The front of the next folder was glued to the front of the previous folder. I punched a half circle on the top of the folder fronts to make it easy to pull things in and out of the pocket. The back of the last folder was glued to the back of the previous folder. Again, only three sides were hot glued to form the last pocket.
I used one place folder to form the binding of the book. I cut off the bottom of the folder and added a few score lines to match the score lines that were already on the folder. The green ribbon was hot glued on first and then I glued the spin on over that.
I think the book will look really nice decorated with vintage inspired papers. The G45 steampunk debutante and some other papers that I have be great. Hopefully I'll be able to finish it up in the next couple of days. I have several other projects in the works and a busy week ahead.
Have a great week everyone!
File cabinet Goodwill find
Check this out!!
I bought this at my local Goodwill store.
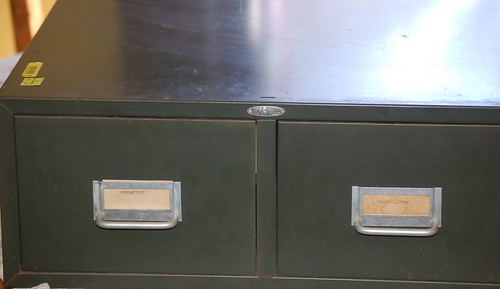
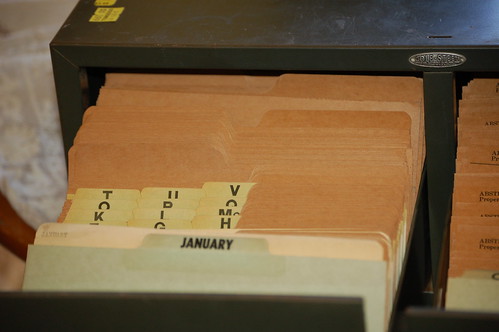
It is FULL of small folders that would be great for making mini scrapbooks or for altered projects.
There are about 130 of the plain folder and about 250 of the printed folders.
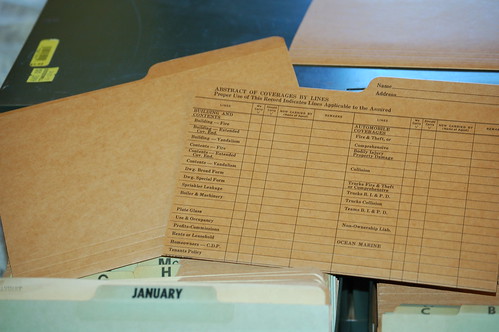
Some of the folders are plain and some are printed. They are 8" x 5 5/8" including the label area at the top.
I will make a mini out of some of them soon. I'll post pics when it's assembled.
The cabinet and all the folders cost $3.99!
I bought this at my local Goodwill store.


It is FULL of small folders that would be great for making mini scrapbooks or for altered projects.
There are about 130 of the plain folder and about 250 of the printed folders.

Some of the folders are plain and some are printed. They are 8" x 5 5/8" including the label area at the top.
I will make a mini out of some of them soon. I'll post pics when it's assembled.
The cabinet and all the folders cost $3.99!
Wednesday, March 23, 2011
Mini scrapbook tutorials
Hello everyone!
Within the next week you will be able to find my first mini scrapbook tutorial online at
http://www.scrapbook-crazy.com/
Check it out and let me know what you think.
This site has lots of great tutorials including one to make a mini from toilet paper rolls! You have to check it out. It really helped get my creative wheels turning!
Tuesday, March 22, 2011
Thank you Janet!!
Hi everyone!
My friend Janet spoiled me! Look at what she gave me!
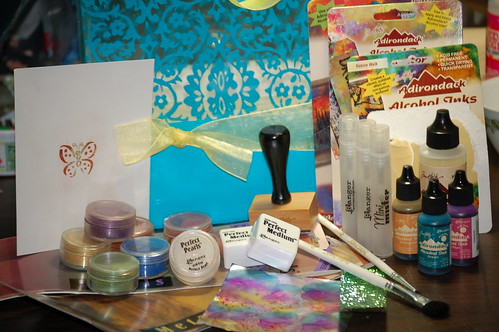
She gave me two sets of perfect pearls, a set of alcohol inks, alcohol ink blending solution, and three mini misters. Isn't she awesome!?
I'm going to have so much fun with this stuff. I already tried it out a little bit. The butterfly on the white paper has two colors of perfect pearls on it. The metallic square and ribbon in the front was colored with the alcohol inks.
She also gave me 16 flowers and all of the stuff to make more. I made one these flowers and a butterfly at her house several years ago. She hosted a class. You can see the flower that I made in my craft room pics (first post).
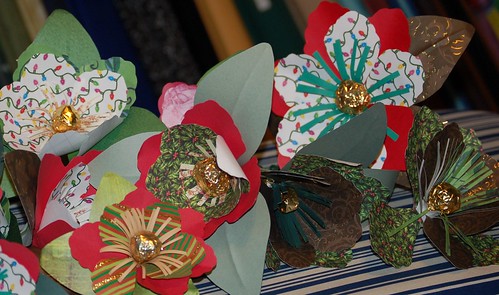
She gave me supplies for making these flowers including three rolls of floral stem wrapping tape, pattern pieces, floral wire etc. She used gold foil wrappers for the centers of some of the completed flowers. This foil is meant for candy making. You wrap the candy in it. The inked square in the first photo is the back side of one of the candy wrappers. I think I'll be able to do all sorts of interesting things with the wrappers. She gave me two packages of them.
Again I say THANK YOU JANET!!!!!!
My friend Janet spoiled me! Look at what she gave me!

She gave me two sets of perfect pearls, a set of alcohol inks, alcohol ink blending solution, and three mini misters. Isn't she awesome!?
I'm going to have so much fun with this stuff. I already tried it out a little bit. The butterfly on the white paper has two colors of perfect pearls on it. The metallic square and ribbon in the front was colored with the alcohol inks.
She also gave me 16 flowers and all of the stuff to make more. I made one these flowers and a butterfly at her house several years ago. She hosted a class. You can see the flower that I made in my craft room pics (first post).

She gave me supplies for making these flowers including three rolls of floral stem wrapping tape, pattern pieces, floral wire etc. She used gold foil wrappers for the centers of some of the completed flowers. This foil is meant for candy making. You wrap the candy in it. The inked square in the first photo is the back side of one of the candy wrappers. I think I'll be able to do all sorts of interesting things with the wrappers. She gave me two packages of them.
Again I say THANK YOU JANET!!!!!!
Sunday, March 20, 2011
Poker table cribbage board
I have mentioned before that my husband does woodworking. He made a hummingbird cribbage board that I posted recently. This is his newest board. He just finished it this morning.
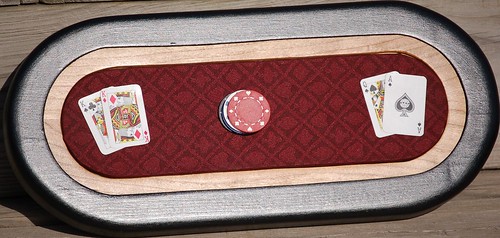
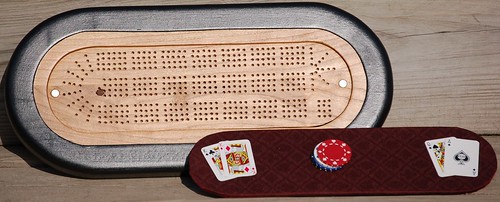
Isn't it BEAUTIFUL! Of course, I think everything my husband makes is beautiful but I really think he did a fantastic job on this one!
He made it look like the poker table that he helped my step dad make.
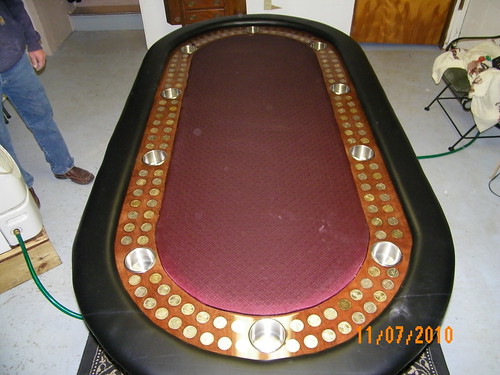
They made this full size table together. Les made the cribbage board as a gift for Tom and Mom.


Isn't it BEAUTIFUL! Of course, I think everything my husband makes is beautiful but I really think he did a fantastic job on this one!
He made it look like the poker table that he helped my step dad make.

They made this full size table together. Les made the cribbage board as a gift for Tom and Mom.
Saturday, March 19, 2011
Beads
Okay, so I wasn't going to go to Goodwill this week but I went yesterday anyway!
This is what I bought:
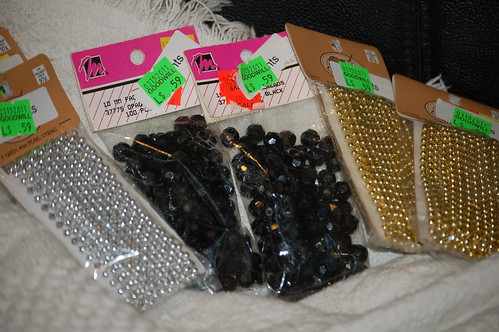
The silver and gold pearl strings are each 5 yards for $0.59 each. There are 100 black beads in each package for $0.59 each. So for less than $4 I have 200 beads and 20 yards of 4mm pearl string. Not bad.
If I had alcohol inks I could color the pearl string just about any color I want for all sorts of projects but alas I do not own alcohol ink. Maybe I will try to use some of my husband's spray paint or lacquer.
This is what I bought:

The silver and gold pearl strings are each 5 yards for $0.59 each. There are 100 black beads in each package for $0.59 each. So for less than $4 I have 200 beads and 20 yards of 4mm pearl string. Not bad.
If I had alcohol inks I could color the pearl string just about any color I want for all sorts of projects but alas I do not own alcohol ink. Maybe I will try to use some of my husband's spray paint or lacquer.
Swap
Hi everyone,
My friend Hazel and I swapped some stuff recently. I just received her package yesterday. It four days to get here from the UK! She wanted to swap this ATC book for some Ephemera so I sent her some cards, sheet music etc. She sent me the book and some paper napkins. Aren't the napkins gorgeous!
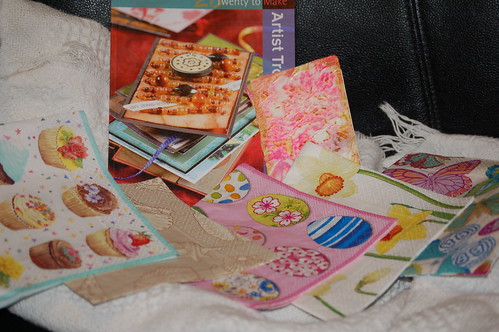
You are probably wondering why I would be excited over napkins. Well, she and I moderate a group that she started on Ravelry. The group is called Playshop. Group members lead "playshops" that teach everyone how to do different types of craft projects. Hazel led the first playshop for the group. It was how to make napkin art cards. I made a couple of cards using her instructions. Now I have lots of other pretty napkins to craft with! Thanks again Hazel!
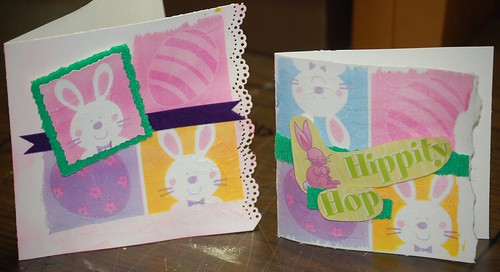
My friend Hazel and I swapped some stuff recently. I just received her package yesterday. It four days to get here from the UK! She wanted to swap this ATC book for some Ephemera so I sent her some cards, sheet music etc. She sent me the book and some paper napkins. Aren't the napkins gorgeous!

You are probably wondering why I would be excited over napkins. Well, she and I moderate a group that she started on Ravelry. The group is called Playshop. Group members lead "playshops" that teach everyone how to do different types of craft projects. Hazel led the first playshop for the group. It was how to make napkin art cards. I made a couple of cards using her instructions. Now I have lots of other pretty napkins to craft with! Thanks again Hazel!

Friday, March 18, 2011
Mini scrapbook made out of drink coasters
I was asked to lead a playshop in the playshop group on Ravelry. This is the project I decided to teach.
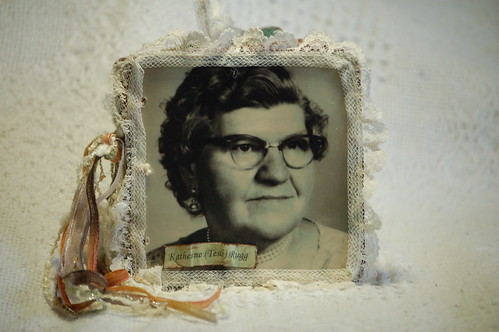
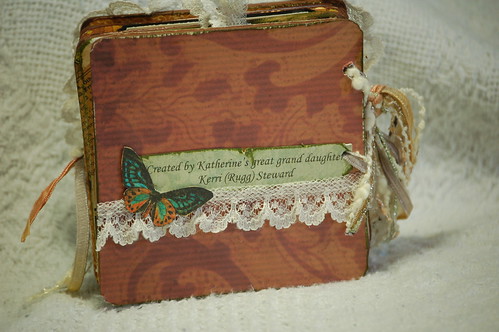
This is the cover. Katherine (Tesch) Rugg was my Great Grandmother.

The papers in the pocket to the right list all of her brothers and sisters.
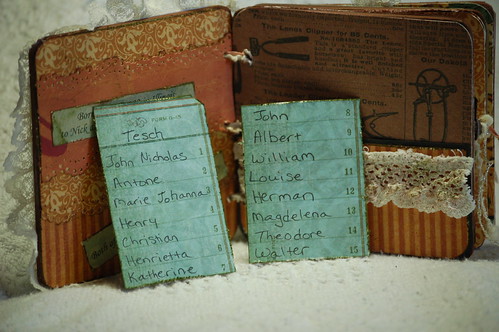
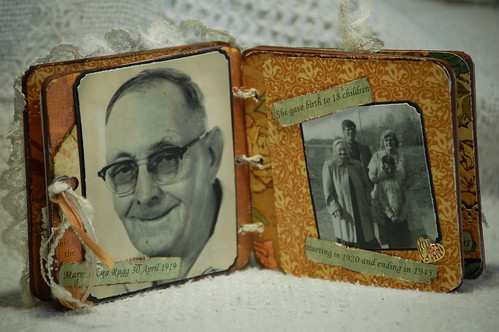
The page on the left has a pocket. The one on the right flips open. The heart on the right is one of my Mom's old ear rings. I cut the post off and used it as a page embellishment. I think it looks really nice.
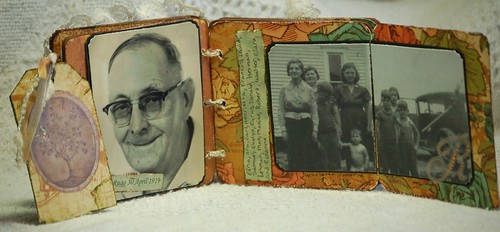
There is a place on the back of the tag for information about Great Grandpa.
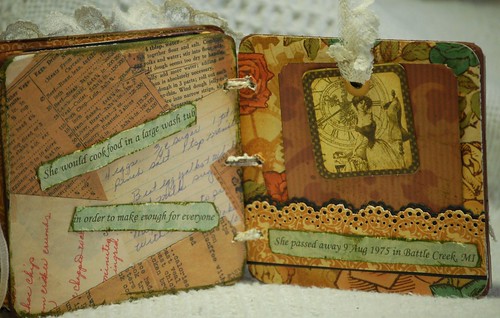
The pages are simple but I think they are really pretty. I used some Graphic 45 paper but most of the other paper has been in my stash for a while. All of the pages are cork drink coasters covered with decorative papers.

This is the cover. Katherine (Tesch) Rugg was my Great Grandmother.

The papers in the pocket to the right list all of her brothers and sisters.


The page on the left has a pocket. The one on the right flips open. The heart on the right is one of my Mom's old ear rings. I cut the post off and used it as a page embellishment. I think it looks really nice.

There is a place on the back of the tag for information about Great Grandpa.


The pages are simple but I think they are really pretty. I used some Graphic 45 paper but most of the other paper has been in my stash for a while. All of the pages are cork drink coasters covered with decorative papers.
Wednesday, March 16, 2011
Inspiration
I have mentioned before that I get a lot of inspiration from You Tube. Well, two channels that have really inspired me recently are ThePaperCastle and RachO113.
Today while I had a few minutes to play I decided to get my stamp pads and paint out to see what I could come up with. First, I took several stamp pads directly to a piece of wax paper. I sprinkled some water on the ink and then pressed some paper into the watery ink. Then I sprayed some of my homemade glimmer mist on the wax paper and added a few drops from a re-inker bottle that I've had for probably eight years.
This is what I made:
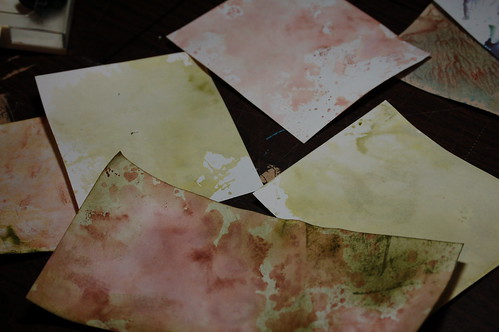
I rubbed the green ink on the bottom piece of paper after I dried the brown with my heat gun.
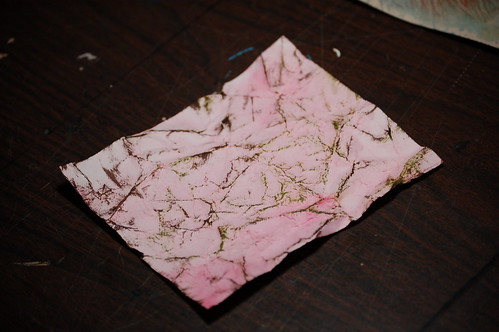
After I pressed this into the ink and water I crumpled it up, dried it and then rubbed brown and green ink pads over the ridges.
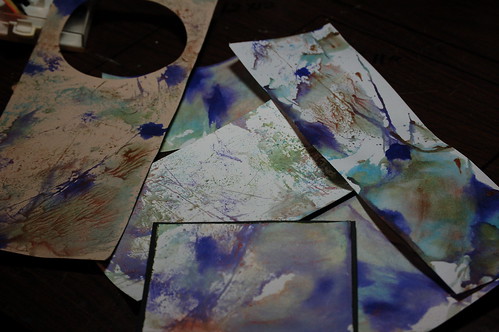
These look so much better in person. The copper color really shimmers. I matted the piece on the bottom with black cardstock.
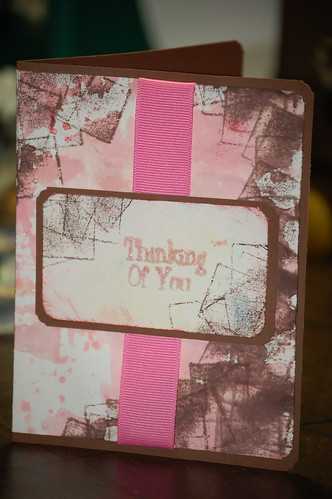
Front
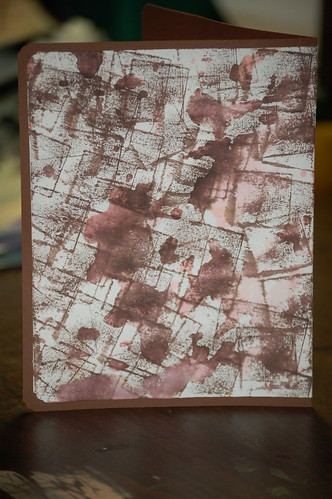
Back
As I was experimenting I just kept grabbing paper out of my scrap drawer. One of the pieces happened to be scored and ready to be made into a card. So, I inked it up and made this card. First I inked the wax paper with pink and brown ink, splashed water on the ink, and pressed the paper into the ink. Then I took the small brown stamp pad I was using directly to the paper to make the square shapes all over the back and parts of the front. For the sentiment on the front I inked up a stamp and masked off the unwanted parts of the stamp so that only the "Thinking of You" was exposed. I stamped it with embossing ink. While the clear embossing powder was still hot I poured some pink glitter on top.
I've had the paper, ink, stamps etc for years. I just recently bought the pink ribbon at Goodwill.
The stamp pads I used are mostly Stampin' Up pads that I bought at least 5 but not more than 8 or 9 years ago.
I started scrapbooking in 1999 using Creative Memories products. There are over 45 completed scrapbooks in my craft room. Most of those are 12x12 books. That doesn't include the books that I have put together for gifts. I'm almost three years behind now though! Crochet, sewing, and lots of other crafts have taken over my brain! I will get caught up eventually though....I hope.
Today while I had a few minutes to play I decided to get my stamp pads and paint out to see what I could come up with. First, I took several stamp pads directly to a piece of wax paper. I sprinkled some water on the ink and then pressed some paper into the watery ink. Then I sprayed some of my homemade glimmer mist on the wax paper and added a few drops from a re-inker bottle that I've had for probably eight years.
This is what I made:

I rubbed the green ink on the bottom piece of paper after I dried the brown with my heat gun.

After I pressed this into the ink and water I crumpled it up, dried it and then rubbed brown and green ink pads over the ridges.

These look so much better in person. The copper color really shimmers. I matted the piece on the bottom with black cardstock.

Front

Back
As I was experimenting I just kept grabbing paper out of my scrap drawer. One of the pieces happened to be scored and ready to be made into a card. So, I inked it up and made this card. First I inked the wax paper with pink and brown ink, splashed water on the ink, and pressed the paper into the ink. Then I took the small brown stamp pad I was using directly to the paper to make the square shapes all over the back and parts of the front. For the sentiment on the front I inked up a stamp and masked off the unwanted parts of the stamp so that only the "Thinking of You" was exposed. I stamped it with embossing ink. While the clear embossing powder was still hot I poured some pink glitter on top.
I've had the paper, ink, stamps etc for years. I just recently bought the pink ribbon at Goodwill.
The stamp pads I used are mostly Stampin' Up pads that I bought at least 5 but not more than 8 or 9 years ago.
I started scrapbooking in 1999 using Creative Memories products. There are over 45 completed scrapbooks in my craft room. Most of those are 12x12 books. That doesn't include the books that I have put together for gifts. I'm almost three years behind now though! Crochet, sewing, and lots of other crafts have taken over my brain! I will get caught up eventually though....I hope.
Tuesday, March 15, 2011
Poker table
My step-dad, Tom, and my husband, Les, made a poker table at the end of last year. They did a great job! I made a slide show about the construction of the table. I'm not great at making slide shows but it at least shows the process of making the table.
We finally put it on you tube yesterday.
http://www.youtube.com/watch?v=-VTZ5M2WSe0
We finally put it on you tube yesterday.
http://www.youtube.com/watch?v=-VTZ5M2WSe0
Flowers and You Tube videos
Hi everyone!
I watch lots of you tube videos. When I want to learn something new or get ideas for a specific project I often check You Tube.
These are some videos that I have used recently:
Making your own Prima flowers:
http://www.youtube.com/watch?v=mjOEVtzGUiA
How to make lollipop flowers:
http://www.youtube.com/watch?v=VSoPDTIJw6E
I used a lollipop flower on my crocheted mini album.
How to make your own glimmer mist:
http://www.youtube.com/watch?v=hzstTZtGFNM
I watched several glimmer mist videos including this one. They all gave me ideas about how I wanted to make mine.
So, if you have read any of my recent posts you have probably noticed that I bought a huge spool of lace recently. I also mentioned making glimmer mist.
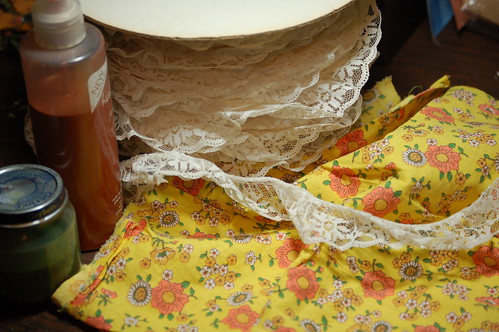
This is the lace, fabric, and two colors of homemade glimmer mist that I used for these flowers. I also used the first You Tube video that I listed above to learn how to make these flowers. Yes, the fabric really is this bright.
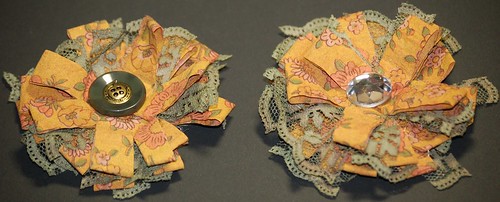
These are the completed flowers. They look great with the Steampunk Debutante paper by Graphic 45. I know I'm a little obsessed with that paper collection right now. It's the only G45 product that I currently own. It's going a long way. I've used it on several projects and have ideas for more!
So, the cost of this project:
Fabric: Free
Lace: $0.03 ($3.50 for probably 50 yards. I used less that 24 inches for these two flowers.)
Homemade Glimmer mist: $0 (I have had the paint for years and have used it on lots of projects)
Button: Free
Bling: Less that $0.10
Grand total: $0.13 for two flowers
I watch lots of you tube videos. When I want to learn something new or get ideas for a specific project I often check You Tube.
These are some videos that I have used recently:
Making your own Prima flowers:
http://www.youtube.com/watch?v=mjOEVtzGUiA
How to make lollipop flowers:
http://www.youtube.com/watch?v=VSoPDTIJw6E
I used a lollipop flower on my crocheted mini album.
How to make your own glimmer mist:
http://www.youtube.com/watch?v=hzstTZtGFNM
I watched several glimmer mist videos including this one. They all gave me ideas about how I wanted to make mine.
So, if you have read any of my recent posts you have probably noticed that I bought a huge spool of lace recently. I also mentioned making glimmer mist.

This is the lace, fabric, and two colors of homemade glimmer mist that I used for these flowers. I also used the first You Tube video that I listed above to learn how to make these flowers. Yes, the fabric really is this bright.

These are the completed flowers. They look great with the Steampunk Debutante paper by Graphic 45. I know I'm a little obsessed with that paper collection right now. It's the only G45 product that I currently own. It's going a long way. I've used it on several projects and have ideas for more!
So, the cost of this project:
Fabric: Free
Lace: $0.03 ($3.50 for probably 50 yards. I used less that 24 inches for these two flowers.)
Homemade Glimmer mist: $0 (I have had the paint for years and have used it on lots of projects)
Button: Free
Bling: Less that $0.10
Grand total: $0.13 for two flowers
Monday, March 14, 2011
Cribbage board
My husband makes all sorts of wood projects. He has made shelves, tables, clocks, and all sorts of other decorative items. Here is his latest completed project.

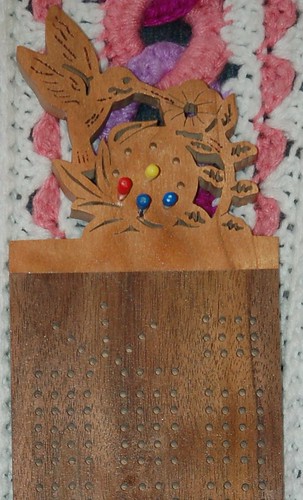
He made this for a man that he works with. His co-worker wanted a cribbage board with a hummingbird for his wife so Les designed this. I think it's beautiful. Wouldn't it be nice hanging on the wall of a family room or game room? Just take it off the wall and play!
Cribbage is a fun game. My brother and I grew up watching our parents, Aunts, and Uncles playing the game. We both learned when we were about eight years old. You don't have to have a board to play but I think it's more fun that way.
Sunday, March 13, 2011
Cheap crafting
Crafting can get expensive. So, I try to find as many ways as possible to save money. Here are a couple of ways I have found recently.
I've been playing around with making homemade glimmer mist. I watched several You Tube videos about it. So, I made a green and copper colored one but I didn't have any spray bottles. My Aunt went through her cupboards and found a bunch of things she didn't want including two bottles of body spray. I don't use body spray or any other perfume because it gives me headaches. So, I took the bottles and tossed the perfume.
I made two colors of homemade semi-sparkly paint today.
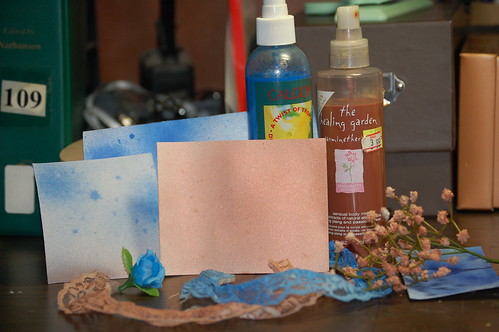
I sprayed some scrap paper, lace, and flowers with both colors. I think they turned out nice. I could have made half as much as I did but oh well. I'll have plenty for experimenting. The flowers were white.
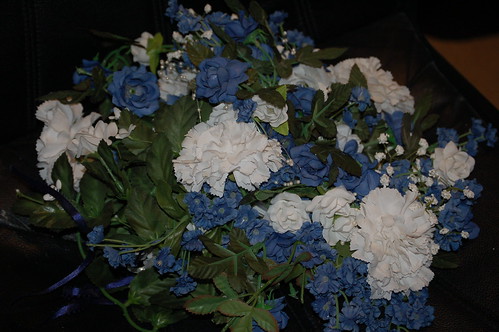
My husband and I were married on May 20, 2000. I saved my bouquet. It was displayed in our living room for a long time but it has been in our closet for the last several years. My husband doesn't love the idea, but I have decided to take it apart and use the flowers and pearl strands for different projects. It's just taking up space in the closet. What am I going to do with the thing if I don't craft with it? It's falling apart anyway.
So, here it is with only a couple of flowers missing so far.
I've been playing around with making homemade glimmer mist. I watched several You Tube videos about it. So, I made a green and copper colored one but I didn't have any spray bottles. My Aunt went through her cupboards and found a bunch of things she didn't want including two bottles of body spray. I don't use body spray or any other perfume because it gives me headaches. So, I took the bottles and tossed the perfume.
I made two colors of homemade semi-sparkly paint today.

I sprayed some scrap paper, lace, and flowers with both colors. I think they turned out nice. I could have made half as much as I did but oh well. I'll have plenty for experimenting. The flowers were white.
My husband and I were married on May 20, 2000. I saved my bouquet. It was displayed in our living room for a long time but it has been in our closet for the last several years. My husband doesn't love the idea, but I have decided to take it apart and use the flowers and pearl strands for different projects. It's just taking up space in the closet. What am I going to do with the thing if I don't craft with it? It's falling apart anyway.
So, here it is with only a couple of flowers missing so far.

Saturday, March 12, 2011
Crafts and books
Hi everyone!
As you may know, I like to go to Goodwill. I don't shop much beyond Walmart and Goodwill. I barely ever leave the town in which I live. Sometimes it feel like I never leave my house! Anyway, I got to go shopping today!
We got a flyer in the mail a couple of days ago from the Salvation Army. I have never been to a Salvation Army store before. So, my Aunt Sandy and I decided to go. Everything marked with a certain color after 5:00 pm on Saturday is $0.49. We didn't find anything we wanted with yellow tags but we did find some other good stuff. One thing that you crafters might be interested in were a couple of Cricut machines! They were $100. They had three tables of merchandise that looked to be from other stores but with damaged boxes etc. The Cricut Expressions boxes were slightly damaged but other than that they looked great. I didn't have $100 to spend unfortunately. Too bad those didn't have yellow stickers! :)
We also went to Michael's and Big Lots. I haven't been to Big Lots since I was in High School. So, it's been at least 15 years. They had great deals on several things. I haven't been to Michaels in 3 or 4 months. Alot of their $1 items were 1/2 off.
So this is what I bought in all three stores:
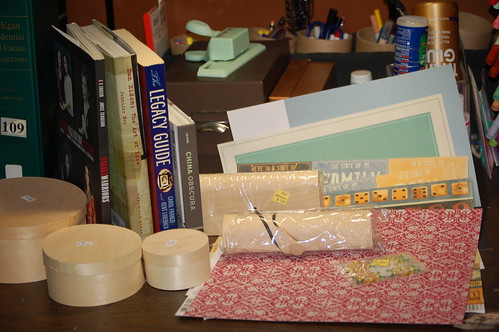
Salvation Army:
Set of three nesting boxes - $1.00
Michael's
Two boxes for altering - $0.50 each
Six sheets of 12x12 scrapbook paper - $0.14 each
Flower Rhinestones - $0.50
Big Lots
Books:
China Obscura (2004) $0.25
The Legacy Guide (Capturing the Facts, Memories and Meaning of Your Life) (2006) - $0.25
Dan Eldon, The Art of Life (2001) - $0.25
Vagina Warriors (2005) - $0.25
I know, I'm a big spender. I need to hold back a little! LOL.
The China Obscura book might be good for taking apart. The pictures would be nice on an altered box. I think I might feel bad ripping the pages out though.
As you may know, I like to go to Goodwill. I don't shop much beyond Walmart and Goodwill. I barely ever leave the town in which I live. Sometimes it feel like I never leave my house! Anyway, I got to go shopping today!
We got a flyer in the mail a couple of days ago from the Salvation Army. I have never been to a Salvation Army store before. So, my Aunt Sandy and I decided to go. Everything marked with a certain color after 5:00 pm on Saturday is $0.49. We didn't find anything we wanted with yellow tags but we did find some other good stuff. One thing that you crafters might be interested in were a couple of Cricut machines! They were $100. They had three tables of merchandise that looked to be from other stores but with damaged boxes etc. The Cricut Expressions boxes were slightly damaged but other than that they looked great. I didn't have $100 to spend unfortunately. Too bad those didn't have yellow stickers! :)
We also went to Michael's and Big Lots. I haven't been to Big Lots since I was in High School. So, it's been at least 15 years. They had great deals on several things. I haven't been to Michaels in 3 or 4 months. Alot of their $1 items were 1/2 off.
So this is what I bought in all three stores:

Salvation Army:
Set of three nesting boxes - $1.00
Michael's
Two boxes for altering - $0.50 each
Six sheets of 12x12 scrapbook paper - $0.14 each
Flower Rhinestones - $0.50
Big Lots
Books:
China Obscura (2004) $0.25
The Legacy Guide (Capturing the Facts, Memories and Meaning of Your Life) (2006) - $0.25
Dan Eldon, The Art of Life (2001) - $0.25
Vagina Warriors (2005) - $0.25
I know, I'm a big spender. I need to hold back a little! LOL.
The China Obscura book might be good for taking apart. The pictures would be nice on an altered box. I think I might feel bad ripping the pages out though.
Lace!!
Hello everyone!
There is a store in my town that I have been to countless times in my life but I haven't been there in a while. It's a hardware store mostly but they carry all sorts of other things too. My husband goes there anytime he needs something for a home improvement project etc. So, he had explored the store. He never told me about the back corner where they have an "as is" and used item section!! They had several huge spools of lace for $3 to $4! They also have a large stack of remnant fabrics. If I had more money to spend I would have bought tons of lace and fabric yesterday. We were there looking for cribbage board pegs. They have everything else in the world, but no cribbage board pegs.
Anyway, this is the lace that I bought for $3.50! My rough estimate is about 50 yards. I started counting it but stopped at 17 yards. I guess I have a short attention span. :) I wasn't even 1/2 way through the spool.
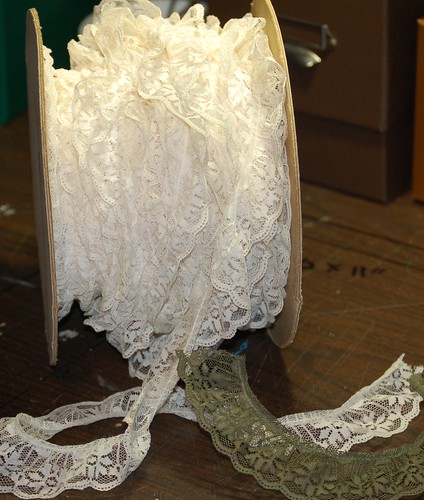
The green lace in the pic is a piece that I cut off the spool and colored with my homemade glimmer mist. I have only made one color so far because I don't have any small spray bottles yet. The green and copper color is mixed in a baby food jar. I have to dip whatever I want to color. Once I have spray bottles I will experiment with more colors. I might also try some fabric dye one of these days.
My husband asked what I was going to do with all of that lace. I told him I would probably never use it all. He just shook his head. :) I told him that I will probably sell some, give some, and use some. If I ever use the whole spool I'll use it for an altered spool project.
The other lace they had at the store was cream, pink, and multi-colored. They had tons of great stuff in the cluttered back corner of the store. I love sifting through piles of stuff to find hidden treasures! Ohhhh!...I think I need help. I'm addicted to treasure hunting!
There is a store in my town that I have been to countless times in my life but I haven't been there in a while. It's a hardware store mostly but they carry all sorts of other things too. My husband goes there anytime he needs something for a home improvement project etc. So, he had explored the store. He never told me about the back corner where they have an "as is" and used item section!! They had several huge spools of lace for $3 to $4! They also have a large stack of remnant fabrics. If I had more money to spend I would have bought tons of lace and fabric yesterday. We were there looking for cribbage board pegs. They have everything else in the world, but no cribbage board pegs.
Anyway, this is the lace that I bought for $3.50! My rough estimate is about 50 yards. I started counting it but stopped at 17 yards. I guess I have a short attention span. :) I wasn't even 1/2 way through the spool.

The green lace in the pic is a piece that I cut off the spool and colored with my homemade glimmer mist. I have only made one color so far because I don't have any small spray bottles yet. The green and copper color is mixed in a baby food jar. I have to dip whatever I want to color. Once I have spray bottles I will experiment with more colors. I might also try some fabric dye one of these days.
My husband asked what I was going to do with all of that lace. I told him I would probably never use it all. He just shook his head. :) I told him that I will probably sell some, give some, and use some. If I ever use the whole spool I'll use it for an altered spool project.
The other lace they had at the store was cream, pink, and multi-colored. They had tons of great stuff in the cluttered back corner of the store. I love sifting through piles of stuff to find hidden treasures! Ohhhh!...I think I need help. I'm addicted to treasure hunting!
Thursday, March 10, 2011
Thrift store craft supplies
Hi everyone!
Sometimes people buy craft supplies because they get a good deal but then never use those supplies. I try really hard not to do that.
This is my latest Goodwill craft haul:
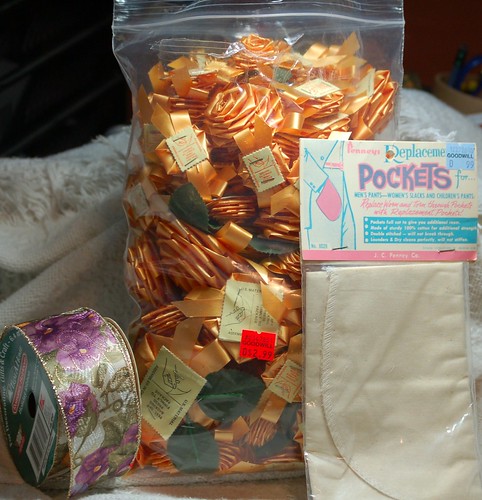
The bag of flowers was $2.99. There are three sizes of flowers. Some have leaves attached but most do not. I like the color but I decided to try my hand at changing the color of one of them. I made a homemade version of glimmer mist. There are several recipes for homemade glimmer mist on You Tube. The ribbons was $0.99. I have gotten ribbon cheaper at Goodwill but I really like this pattern so I decided to buy it. It is a brand new roll of wired ribbon that originally sold for $4.99 at Kmart. The last thing is a brand new package of replacement pants pockets. I don't know the original price but the package label looks pretty old. I paid $0.99. My husband is always complaining that his pants pockets have ripped out. It can't hurt to give these a try.

I found lots of videos on You Tube about making ribbon and fabric flowers. I made this flower and hot glued the beads to the center.
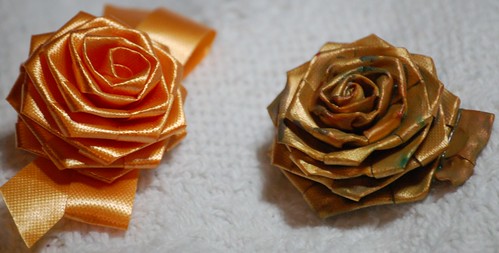
This is the before and after of the flower I "painted" with my homemade glimmer mist. I used a heat gun to dry it. The flower melted and curled up a little. I like how it turned out. It looks really nice with the G45 steampunk debutante paper.
Some of the flowers will be used in RAKs and at least one swap.
Sometimes people buy craft supplies because they get a good deal but then never use those supplies. I try really hard not to do that.
This is my latest Goodwill craft haul:

The bag of flowers was $2.99. There are three sizes of flowers. Some have leaves attached but most do not. I like the color but I decided to try my hand at changing the color of one of them. I made a homemade version of glimmer mist. There are several recipes for homemade glimmer mist on You Tube. The ribbons was $0.99. I have gotten ribbon cheaper at Goodwill but I really like this pattern so I decided to buy it. It is a brand new roll of wired ribbon that originally sold for $4.99 at Kmart. The last thing is a brand new package of replacement pants pockets. I don't know the original price but the package label looks pretty old. I paid $0.99. My husband is always complaining that his pants pockets have ripped out. It can't hurt to give these a try.

I found lots of videos on You Tube about making ribbon and fabric flowers. I made this flower and hot glued the beads to the center.

This is the before and after of the flower I "painted" with my homemade glimmer mist. I used a heat gun to dry it. The flower melted and curled up a little. I like how it turned out. It looks really nice with the G45 steampunk debutante paper.
Some of the flowers will be used in RAKs and at least one swap.
Tuesday, March 8, 2011
Crochet bound mini album
Hi!
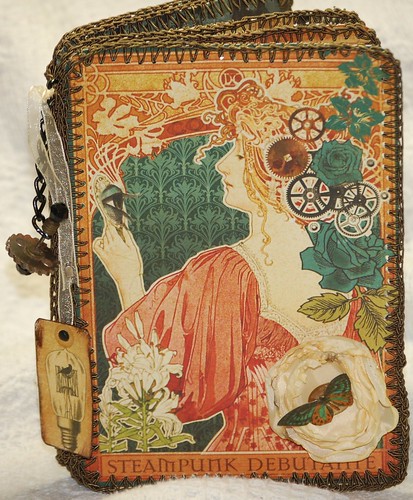
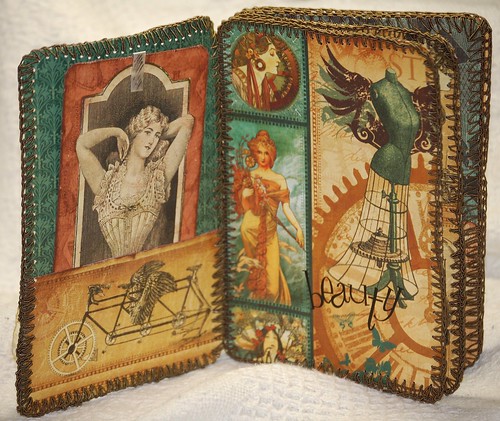
As you know I've been making crochet boxes with thrifted greeting cards. I even made a little purse. Well, I decided to combine my love of scrapbooking and crochet. This is what I made:
All of the paper is from the Graphic 45 Steampunk Debutante collection (the only collection I own because it's expensive!).
I cut the paper to the sizes I need for pages and pockets. Then I punched holes and single crocheted all around all of the pieces. Then I crocheted all of the pages together on the left side to form the binding.
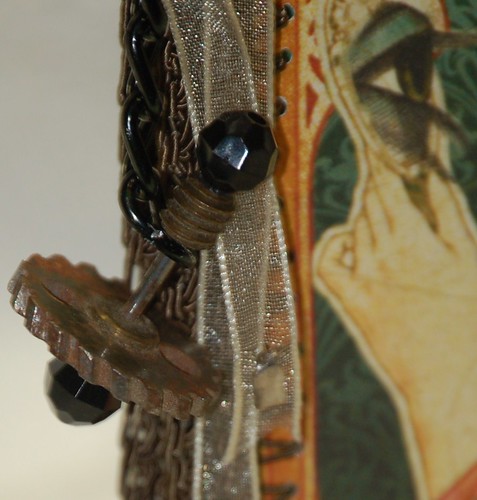
The charm hanging on the side came from my husband's workshop. He had a bucket of old hardware. I picked out the most interesting pieces. I super glued the black beads to it and then hung it from the book with a piece of chain. You might recognize the chain from one of my recent haul posts.
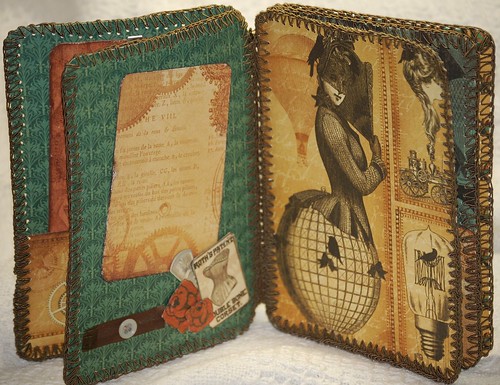
The silver thing sticking out next to the roses is a broken sewing needle threader.
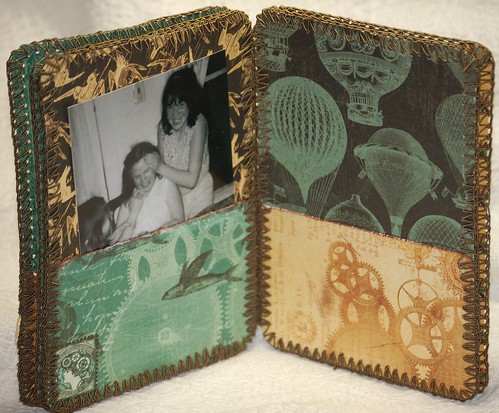
These pocket pages are not done yet. Neither is the next set of pages so I won't even show those.
I'm a little stuck on this project. I will finish it though.
The crochet on this is not difficult but it is time consuming. If you decide to do a project like this, think about the strength of the paper you are using. You might need to double it up.
As you know I've been making crochet boxes with thrifted greeting cards. I even made a little purse. Well, I decided to combine my love of scrapbooking and crochet. This is what I made:
All of the paper is from the Graphic 45 Steampunk Debutante collection (the only collection I own because it's expensive!).
I cut the paper to the sizes I need for pages and pockets. Then I punched holes and single crocheted all around all of the pieces. Then I crocheted all of the pages together on the left side to form the binding.

The charm hanging on the side came from my husband's workshop. He had a bucket of old hardware. I picked out the most interesting pieces. I super glued the black beads to it and then hung it from the book with a piece of chain. You might recognize the chain from one of my recent haul posts.


The silver thing sticking out next to the roses is a broken sewing needle threader.

These pocket pages are not done yet. Neither is the next set of pages so I won't even show those.
I'm a little stuck on this project. I will finish it though.
The crochet on this is not difficult but it is time consuming. If you decide to do a project like this, think about the strength of the paper you are using. You might need to double it up.
Thursday, March 3, 2011
I'm a lucky girl!
Wednesday, March 2, 2011
Canning lid magnets
I obviously did not invent this project. I actually learned it at friends house probably 8 years ago.
This is a fun and easy recycling project. In my family we can alot during the late summer and fall. So, I collect all of the canning lids after using our home canned food. I have a box of lids to craft with.
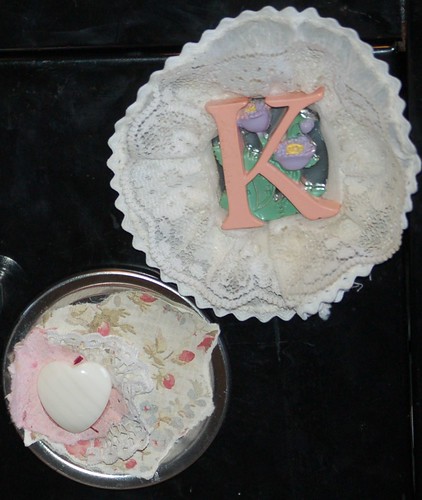
Front. The sky is the limit. You could glue just about anything to the front of a canning lid.
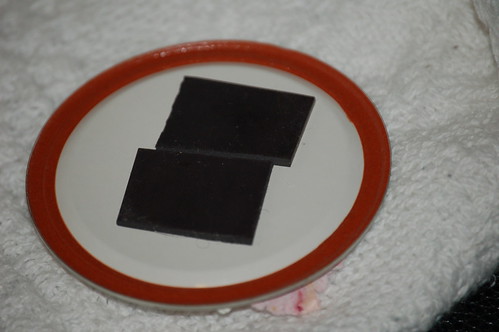
Back. I bought a roll of magnet a long time ago. I just cut pieces off the roll and hot glue the magnet to the back of the lid.
My favorite glue for these magnets is Aleene's tacky glue and hot glue.
This is a fun and easy recycling project. In my family we can alot during the late summer and fall. So, I collect all of the canning lids after using our home canned food. I have a box of lids to craft with.

Front. The sky is the limit. You could glue just about anything to the front of a canning lid.

Back. I bought a roll of magnet a long time ago. I just cut pieces off the roll and hot glue the magnet to the back of the lid.
My favorite glue for these magnets is Aleene's tacky glue and hot glue.
Subscribe to:
Comments (Atom)

